Configure Windows Screensaver via Active Setup

(Or How Active Setup Execution Order Ruined our Week)

At my workplace we recently were given what appeared to be a very simple assignment; deploy a custom screensaver to a group of machines and make it active. The active screensaver is a user setting and is stored at HKCU\Control Panel\Desktop\SCRNSAVE.EXE. The screensaver was packaged as an MSI but since it had no entry points to trigger a repair of the HKCU registry entries, the repackaging team used Active Setup to trigger the repair for each user that logs on. They’ve done this hundreds of times before and it always works as expected. In fact, years ago, I made a merge module that can be simply dropped into an MSI to run a custom action that automatically creates the appropriate Active Setup Registry keys. So there is almost nothing that can go wrong, until of course it does.

Everything worked as expected for existing users that already had profiles on the machine, but for new users the screensaver was set to none. Everything appeared to be working as expected, Windows Installer logs showed that the repair had happened without errors, but the key was missing for a new user.

Eventually I got involved and did a procmon boot capture to figure out what was happening. It turns out the key was being created as expected, but then was deleted a second later.

procmon log
procmon log

Digging a little deeper into the command performing the RegDeleteValue operation revealed the full command line, %SystemRoot%\system32\regsvr32.exe /s /n /i:/UserInstall %SytemRoot%\system32\themeui.dll, which quickly led me right back to… Active Setup.

Active Setup Registry

It seems the default theme configuration is triggered via Active Setup and it was happening after our screensaver configuration. Google wasn’t very helpful for figuring out if the Active Setup execution order could be manipulated but I did find one clue:

Finally, it is possible to define the order in which Active Setup commands are run - the clues are in the registry so I will leave it to you to figure this out! (Or you can email me…)

Basically, the Active Setup commands are run in the alphabetical order of the entries under Installed Components. Since our merge module automatically uses the MSI ProductCode GUID for this entry, we simply needed to change the ProductCode to something that occurs after {2C7339CF–2B09–4501-B3F3-F3508C9228ED} and we were all set.

Unlock an Active Directory Account Using Mac OS X Directory Utility

Recent versions of OS X integrate well with Microsoft’s Active Directory. As an IT professional working in a primarily Windows-based environment, I can still perform most of my job just fine with a Macbook without resorting to Bootcamp or virtual machines. I do use Jump Desktop for remoting into servers to run Windows-only administrative tools though. One of those tools I frequently need to use is Active Directory Users and Computers. More and more though I’ve been using the native OS X Directory Utility to perform some of the tasks that I previously would have needed ADU&C for. This tool is more like the Active Directory Services Interface Editor (adsiedit.msc) than ADU&C because it presents you with all the attributes of an object without simple GUI buttons for common tasks. But that doesn’t mean it can’t be used for those tasks if you know how.

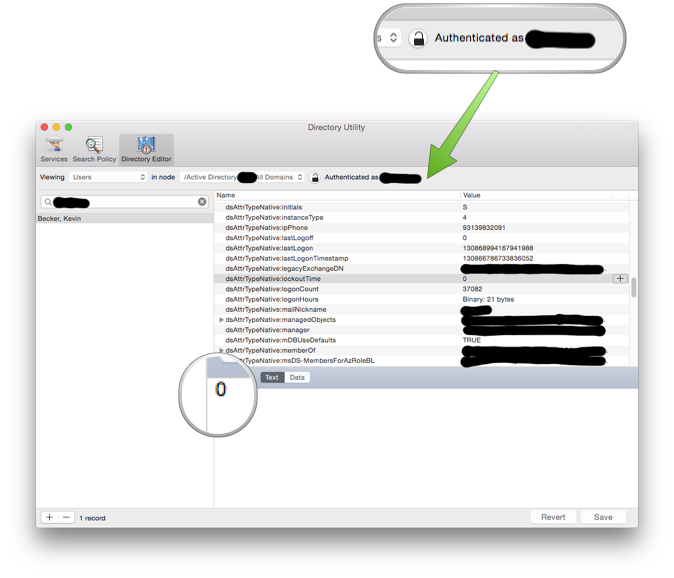
One common situation is unlocking a user’s account after too many invalid password attempts. To unlock an AD account using Directory Utility follow the steps below. Note: the screenshots below are redacted to hide any internal details of my workplace AD environment.

  • Launch Directory Utility(This handy app is hiding in /System/Library/CoreServices/Applications/)
  • Switch to the Directory Editor tab
  • Set the node to your domain rather than /Local/Default
  • Click the lock to authenticate with an account that has the necessary rights. This doesn’t need to be the same account you are currently logged in as.
  • Search for the user in question and then scroll down to the lockoutTime attribute. If this value is anything other than zero, the account is locked out.
Directory Utility
Directory Utility
lockoutTime
lockoutTime
  • Change the lockoutTime attribute to 0 and the user’s account is now unlocked.

Save SCCM Inventory Troubleshooting Information

A coworker asked me this morning if I remembered troubleshooting an SCCM file inventory issue a few years ago.  We had to create a special file that would cause SCCM to save software inventory information.  I barely even remembered doing it, much less what what the name the file and where to put it.  It took a little googling to track it down so I figured I'd write a quick blog entry for my own future reference since I no longer actively do SCCM administration. The short answer to create one of following files:

  • %systemroot%\system32\ccm\inventory\temp\archive_reports.sms  (32-bit)
  • %systemroot%\SysWOW64\ccm\inventory\temp\archive_reports.sms (64-bit)

When SCCM sees this file it will keep copies of the XML files that contain inventory scan information which would ordinarily be deleted.  You should delete this file when you are done troubleshooting or you will eventually run out of space.

You can find more details about this file as well as two other special SCCM files, no_sms_on_drive.sms and skpwi.dat, on this technet blog post.

Reverse Scrolling on Windows 8

Somehow I managed to get a Mac Mini for my primary work desktop (even though my job is primarily Windows based).  I also have a company MacBook Air and an iMac at home.  So basically grown so used to the reverse scrolling introduced in Mac OS Lion that Windows drives me crazy now.  We've been evaluating Windows 8 and I'm trying to use it as my primary OS to immerse myself but I just can't take the "normal" scrolling, especially when I'm using it on my MacBook. There are lots of links on the internet pointing to 3rd party tools to modify this but eventually I found a better solution, editing one registry key.  That blog specifies Windows 7 but it also works on Windows 8.  In addition to "FlipFlopWheel" I also changed "FlipFlopHScroll".

The steps, as copied from Volker Voecking's blog are:

  1. Find the hardware ID of the mouse
    • Go to the mouse control panel
    • Select “Hardware” tab
    • Click “Properties” button
    • Select “Details” tab
    • From the drop-down list choose “Hardware IDs”
    • Save the VID*** entry ( e.g. VID_045E&PID_0039 )
  2. Find and change the corresponding configuration settings in the registry
    • Run regedit.exe
    • Open Key: HKEY_LOCAL_MACHINE\SYSTEM\CurrentControlSet\Enum\HID
    • Here you should find an entry for the hardware ID of your mouse
    • In all sub-keys of the hardware id key look for the “DeviceParameters” key and change the “FlipFlopWheel” value from 0 to 1
  3. Make it work
    • Unplug the mouse
    • Count to five :-)
    • Plug the mouse back in

Reset Terminal Services Session Remotely

I had to log onto a Windows server today to run a script and was hit with the common "The terminal server has exceeded the maximum number of allowed connections." error.  No big deal, I'll just connect to the console session with "mstsc /console", right?  Apparently not.  It seems that the /console switch is gone and connecting to Session 0 remotely is no longer allowed.  There is now a /admin switch but that seems to only allow you to reconnect to an existing session that you initiated and in my case I needed to kick a different user off the box in order to connect. The solution was a few simple terminal services command line tools.  The QUERY command lets you view the active sessions on the server and RESET SESSION will let you boot off the offending user.

C:\>query session /server:SERVER01
No session exists for *

If you get this message it's likely because your account doesn't have the necessary rights on "server01". You can use "net use" to open a session on the remote server with different credentials.

C:\>net use /user:dom\adminaccount \\SERVER01\c$
Enter the password for 'dom\adminaccount' to connect to 'SERVER01':

Update: I've had issues using "net use" to open a session with different credentials.  A more reliable solution is to start a new command shell as an administrative account as shown below.

C:\>runas /user:dom\adminaccount cmd
Enter the password for dom\adminaccount:
Attempting to start cmd as user "dom\adminaccount" ...

After you enter your password you should be told the command completed successfully. Then you can issue the query command again.

C:\>query session /server:SERVER01
SESSIONNAME	USERNAME	ID	STATE	TYPE	DEVICE
console				0	Conn	wdcon
rdp-tcp				65536	Listen	rdpwd
rdp-tcp#113	user01		2	Active	rdpwd
		server01	4	Disc	rdpwd
		adminaccount	6	Disc	rdpwd

In this case I'm going to kill the connection for "user01" which is session 2.

C:\>reset session 2 /server:SERVER01

And now I'm good to go and can remote into my server to run my script.